HLB is here to provide you the right support for your sole proprietorship business.
We make banking simpler for you so that you can focus on growing your business.

Admin Clerk: A helping hand for your business
The Admin Clerk feature enables you to delegate day-to-day tasks to your trusted assistant or employee. They can access your Business Account to:
 Perform fund transfers and bill payments
 Save favourite beneficiaries or payees for future transactions
You have full control of your Admin Clerk’s access and transaction settings, such as:
 Set permitted transaction types

Set daily transactions limit
 Enable, disable or change an Admin Clerk’s access

Simple banking at one place
 Pay suppliers locally easily via online Fund Transfer
 Pay overseas suppliers from over 200 countries with competitive foreign exchange rates from as low as RM10
 Pay business utilities i.e. water, wifi, electricity via online Bill Payments
 View and download up to 2 years of e-Statements
 Single access for both your Business & Personal Account
Convenient & Secure

Choose your preferred language between English, Bahasa Melayu or Mandarin for your HLB Connect App
 Log in to your HLB Connect App securely using your phone’s biometric features
 Use AppAuthorise as an additional security feature to authorise your non-Favourite transactions
 Set daily transactions limits

If you are an existing HLB Connect user, login now to enjoy these features
Terms and conditions apply.
Only the Sole Proprietor/Business Owner can add an Admin Clerk. Here’s how:
Step 1: Click on the Business Account you wish to designate an Admin Clerk
Step 2: On ‘Business Account’ page, click ‘Add’ to create an HLB Connect login credentials for your Admin Clerk

Step 3: Setup the following for your Admin Clerk:
(i) Admin Clerk details (i.e. Name, Mobile Number, Email Address & Date of Birth)
(ii) Admin Clerk HLB Connect login credentials (i.e. Username, Password & Security Picture)
(iii) Setup the required daily limit and function access
Step 4: Review details and enter six-digit TAC sent to your registered mobile number
As a reminder when creating a login credential for your Admin Clerk:
- DO NOT use the same password as your individual HLB Connect user login
- DO NOT use the same password for different Admin Clerks
(i) ‘Enable’ an Admin Clerk’s access
If you have previously disabled an existing Admin Clerk’s access, follow the steps below to enable/reactivate:
Step 1: Click on the Business Account you wish to enable/reactivate an Admin Clerk access
Step 2: On ‘Business Account’ page, click ‘Manage’ under the existing Admin Clerk’s name. You will also see that the profile status is currently ‘Disabled’

Step 3: On ‘Manage Admin Clerk’ page, scroll down to ‘Profile Status’ and click ‘here’ to enable access. Should you wish to change the daily limit/function access, click ‘Edit Details’ under ‘Account & Permission Settings’

Step 4: Review details and enter six-digit TAC sent to your registered mobile number
(ii) ‘Disable’ an Admin Clerk’s access
Step 1: Click on the Business Account you wish to disable an Admin Clerk access
Step 2: On ‘Business Account’ page, click ‘Manage’ under the existing Admin Clerk’s name. You will also see that the profile status is currently ‘Active’

Step 3: On ‘Manage Admin Clerk’ page, scroll down to ‘Profile Status’ and click ‘here’ to disable access

You will need to approve the transactions within 7 days (including Weekends & Public Holidays) from the request made by your Admin Clerk, otherwise it will be cancelled.
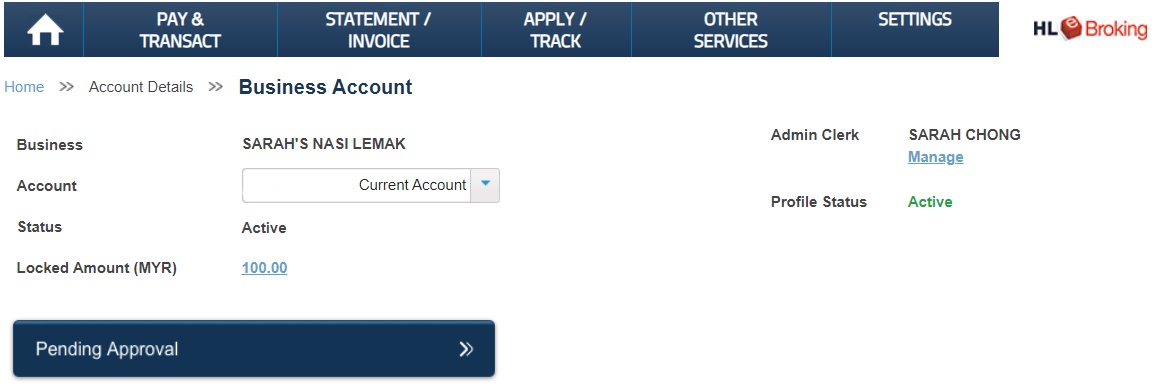
Step 1: Click on the Business Account You will see a button that says ‘Pending Approval’

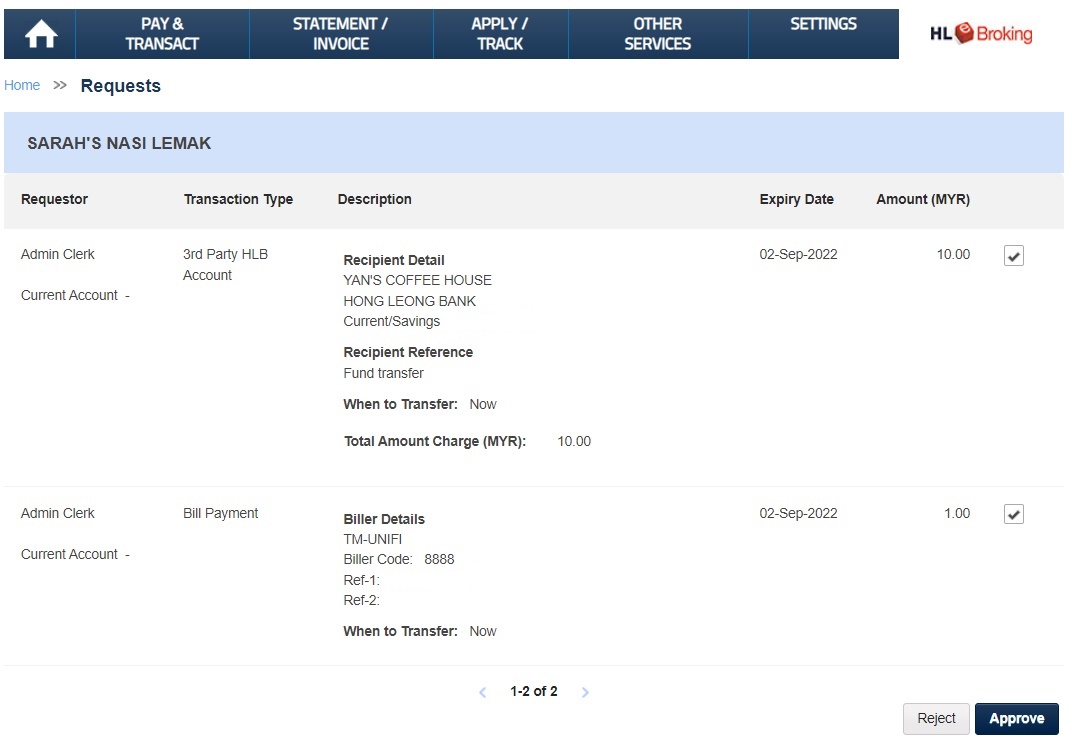
Step 2: In the ‘Requests’ page, you can select single or bulk (up to 5) transactions to ‘Approve’ or ‘Reject’

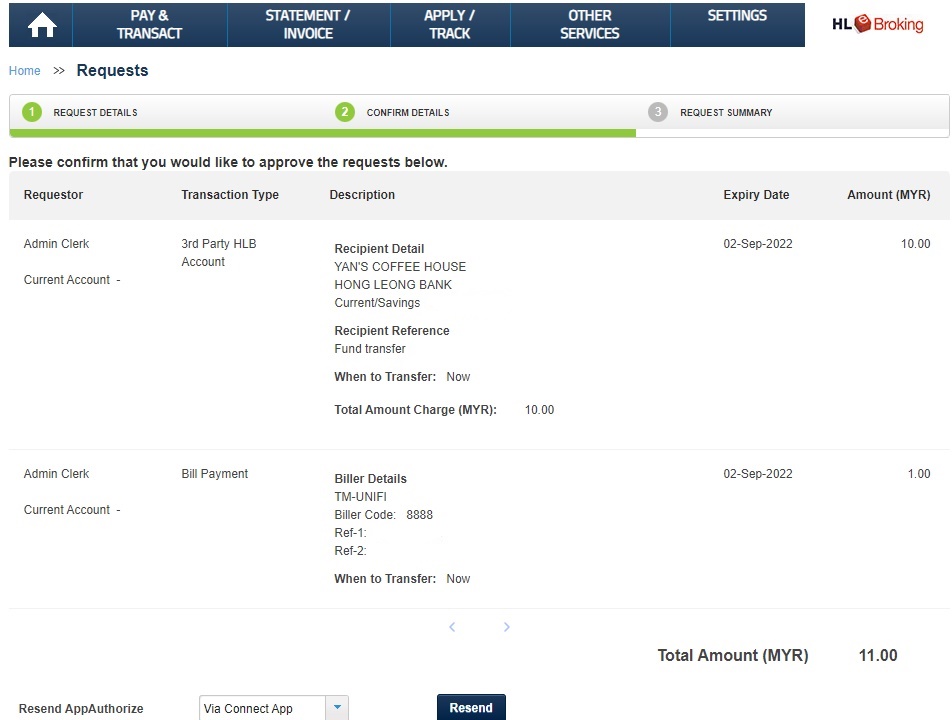
Step 3: Once you click ‘Approve’, a ‘Confirmation’ page will appear. As the account owner, you will be required to approve your transactions via AppAuthorise on your HLB Connect App


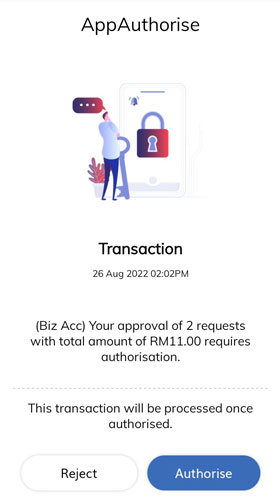
Step 4: Click ‘Approve’ or ‘Reject’ AppAuthorise on your HLB Connect App. If you have approved multiple transactions at one time, you will see a summary of your transaction value
Step 5: Check HLB Connect Online to view the final status of your transactions


